I have made many a quilt in my nearly 30 years of life and I am always so excited to give them away. People enjoy receiving quilts, but I think that they would enjoy them a lot more if they truly understood all of the work that goes into making one. I mean cutting the pieces! Piecing the top! Oh, The ironing! Ahh!
I typically make this quilt in one day, from cutting, to wrapping it up in gift paper. However, this time around, I allowed myself to cut on one day, sew the top on another day, and then I put all of the layers together on a third and final day. I have made this particular quilt many times for babies and military personnel.
Once you give this quilt a try, it will be your go to quick quilt. My mom got this quilt from a magazine, back when I was in high school, so at least 15 years ago. She used it to make me a Veggie Tales quilt. It is still one of my favorites!
I was at JoAnn's Fabric for something completely different, when I saw the zig-zag and bird material and knew that they would be the perfect combinations, for the quilt I wanted to make for my best friend's baby (due in early September!). They other colors were easy to pair as well.

The completed quilt.

A close-up of the materials used.
Generally, something ends up wonky in my quilts, but for the first time ever, the squares all lined up! This made me extremely happy!
If you would like to make this quilt yourself, here is what you will need:
2 patterned fabrics- 5/8 yard for each fabric
2 plain fabrics- 5/8 yard for each fabric
1- 3/4 yard fabric for backing (45 inches wide, if you can)
Batting (a little bigger than finished size)
Thread that matches fabric
Finished quilt size: Approx. 42- inches x 60- inches
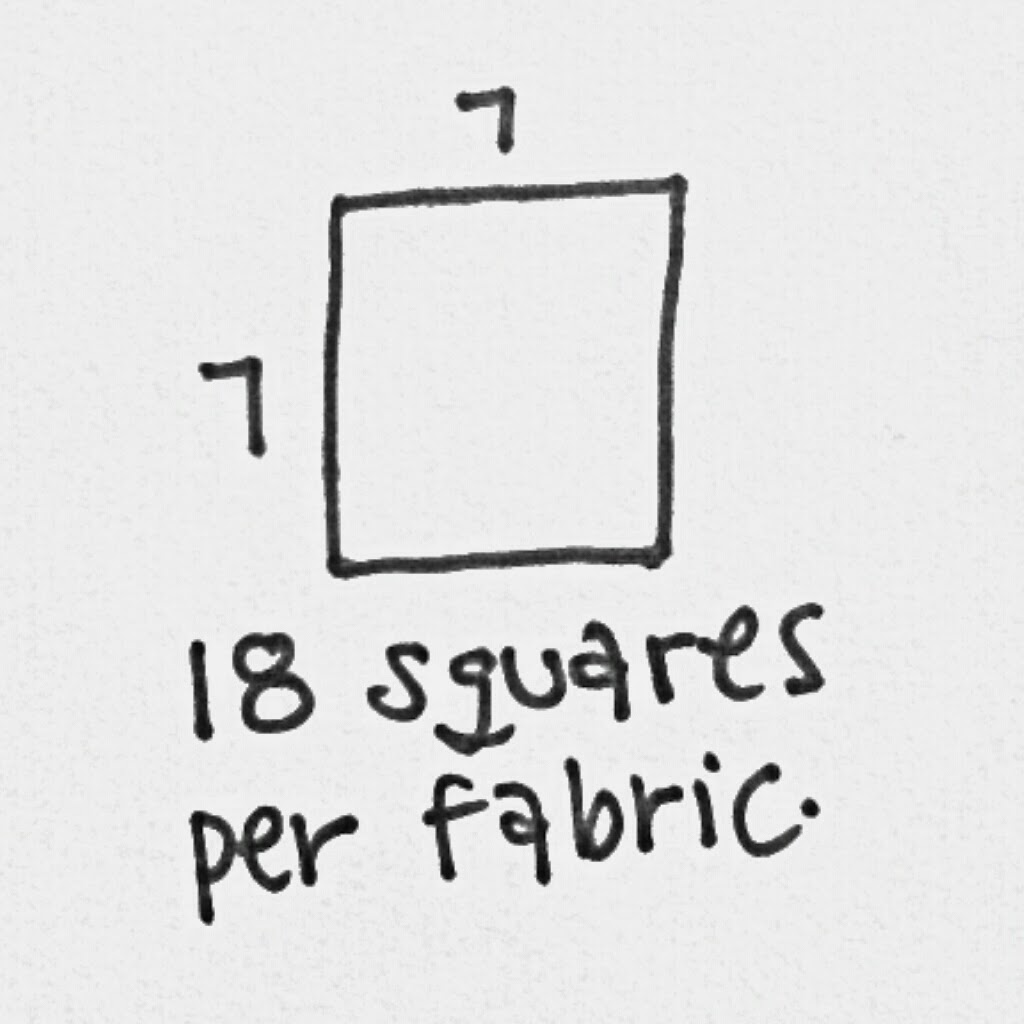
1. Cut each patterned and plain fabric into 7x7-inch squares, you should get about 18 squares per fabric.

3. The quilt is 7 columns by 10 rows.
4. Organize rows.
Row 1= A, B, C, D, A, B, C
Row 2= B, C, D, A, B, C, D
Row 3= C, D, A, B, C, D, A
Row 4= D, A, B, C, D, A, B
Row 5= A, B, C, D, A, B, C
Row 6= B, C, D, A, B, C, D
Row 7= C, D, A, B, C, D, A
Row 8= D, A, B, C, D, A, B
Row 9= A, B, C, D, A, B, C
Row10= B, C, D, A, B, C, D
Diagonally, the same fabric should be lined up and if starting at the top left corner, moving to the bottom right corner, you should be able to see a pattern A, B, C, D.

5. Sew row 1 by placing A, and B right sides together and sewing the right side with a 1/2 inch seam. Continue in same way, until you finish sewing all squares of row one together. Pin a numbered paper to the first square, so you remember which row is which, when you go to sew them to the next row. Press the seams. Pinning a number is really helpful, so you don't play a guessing game later.


6. Sew row 1 and row 2 together, by matching the bottom of row 1 and the top of row two. Fold down row 1, so right sides of both rows are touching. If you like to sew using pins, pin what is now the top side and sew together. I used a 1/2-inch seam.


7. Press open the seam.
8. Repeat the steps, until you have sewn all completed rows, together. Giving you a total of 10.
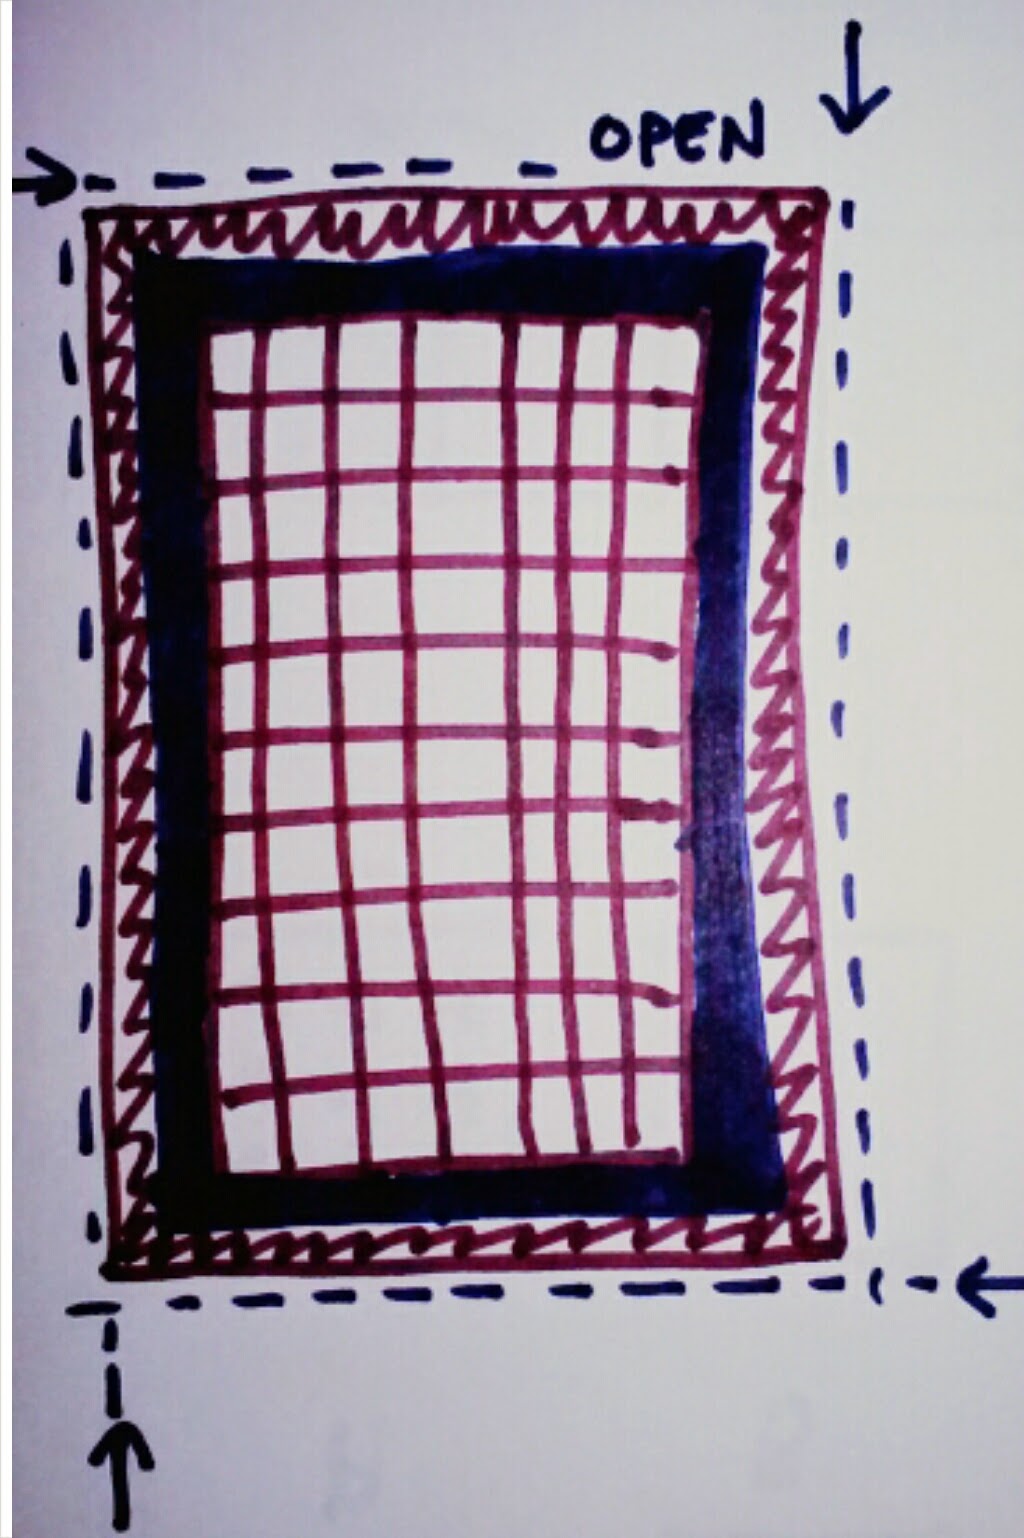
9. Place batting on ground, spread it out.
10. Lay your backing material, right side up. Spread it out, so that the batting is a little bit bigger than your backing material. This means that your wrong side should be laying on top of your batting.
11. Lay your quilt top with the right side down. This means, that you should be looking at the wrong side. Spread it out, so that it lines up with your backing material. If the backing is a bit bigger, that is fine, just make the excess move evenly around the quilt top.
12. Pin all three layers together with pins or saftey pins.

Steps 9, 10, 11, 12
13. Time to sew! Start with a long side, move to a short side, and then the other long side. This leaves you with one short side. Sew this side, but leave an opening, so that you can turn your quilt out. I had an opening of about 10 inches. Trim batting and backing to line up with quilt top.
14. Turn quilt out. Stick a hand in between your quilt top and your backing. Grab the top corner opposite of your opening and pull it through. Then grab the other top corner. You will be needing to pull the fabric through as you move from corner to corner.
15. Once your quilt is turned out, fold fabric of opening inside and pin together, so that that their edges line up with the seam of the quilt. Top stitch this. Reverse at the beginning and end of the stitch.
16. Pull out corners if needed, with a needle. I can never get a perfect square corner.
17. Voila! Lint roll if needed, fold, wrap, and deliver!
I hope you enjoyed my lovely drawings. I thought about using a ruler for about 3 seconds and then decided against it. Ha, ha! I would definitely be appalled if my students tried to turn in work that looked like these!
No comments:
Post a Comment