I always set out to read 25- 30 books on goodreads, for their book challenge. I think I have only met this goal once. It was when I was still working at a pizza shoppe in a crazy and wild search for a teaching job, but yet still had ample time to read. Go figure! Now that I am a teacher, I find it very hard to find time to do anything... this might be why my blog is so spotty. Luckily I am on Christmas break right now and I have time to do whatever I please.
Here is the list of books that I read this year for my successful book challenge:
(P.S. I will be reading 30 books by my 30th birthday, in Novemeber next year, some books will overlap, as my birthday is before the end of the year in which Goodreads gives for their book challenge.)
1. Paris in Color by Nichole Robertson
2. Welcome to the Dead House by R.L. Stine
3. Stay out of the Basement by R.L. Stine
4. Monster Blood by R.L. Stine
5. White Teeth by Zadie Smith
6. Naked by David Sedaris
7. I Was Told There'd Be Cake by Sloane Crosley
8. Chocolat by Joanne Harris
9. The Commander's Desire by Jennette Green
10. Surrender the Heart by MaryLu Tyndall
11. Stardust by Neil Gaiman
12. Slaughterhouse-Five by Kurt Vonnegut
13. Into the Wild by Jon Krakauer
14. Her Reluctant Bodyguard by Jennette Green
15. A Nantucket Christmas by Nancy Thayer
16. The Haunting of Toby Jugg by Dennis Wheatley (I had a paperback, but this link is for Kindle)
17. Waiting for Wren by Cate Beauman
18. Morgan's Hunter by Cate Beauman
19. Falling For Sarah by Cate Beauman
20. Hailey's Truth by Cate Beauman
21. Forever Alexa by Cate Beauman
22. Q&A by Vikas Swarup
23. The Princess in the Opal Mask by Jenny Lundquist
24. Mary Poppins by P.L. Travers
25. Catering to Nobody by Diane Mott Davidson
What have you read this year? Any recommendations?
Sunday, December 29, 2013
Tuesday, December 24, 2013
Christmas Dough Ornament Craft
I found this recipe for ornaments many years ago and I love it! It saddens me a bit that the last time I made this dough was in 2008! Ahh! I have got to make these every year, they are so easy and fun.
I wish I could recall exactly where I got this recipe from, but alas, I don't. It was from some type of parenting website.
I like it, because you can make whatever shape you want by using cookie cutters and you can even dye the dough. I made dinosaurs last time. If you start with a great imagination, then you are off to a good start!

Christmas Dough Ornament Craft
This shiny Christmas dough ornament craft is the perfect finishing touch to decorating the tree. It can also be altered and made into lapel pins, magnets and gift-toppers.
What you'll need:
1/2 cup salt
1 cup flour
1/2 cup water
- If your toppers are large enough, you can make two hole in each so that you can thread ribbon through like a button, only showing a small amount of ribbon on the front.
- These make adorable pins to wear to school. Just don't make a hole. Glue a pin to the back of the completed ornament instead.
- Uncooked salt dough doesn't keep well, so only make enough dough for the ornaments you are going to make. If you are only making a few toppers, halve the ingredients above. The listed amounts will make enough ornaments for a classroom of 20.
**BONUS RECIPE**
When I was a kid, we would make these all of the time! The recipe was given to us by my mom's best friend, Libby. She passed away a couple of months ago and as a tribute to their 50 year long friendship, I share this recipe with you.
Cinnamon Ornaments
Makes: 12- 15 ornaments
Prep time: 30 minutes
Cook time: 2- 1/2 hours or 1 to 2 days drying time
3/4 cup applesauce
1 bottle (4.12 ounces) cinnamon
Other supplies:
Cookie cutters
Drinking straw
Colorful ribbon
1. Preheat oven to 200ºF. Mix applesauce and cinnamon in small bowl until a smooth ball of dough is formed. (You may need to use your hands to incorporate all of the cinnamon.) Using about 1/4 of the dough at a time, roll dough 1/4-inch to 1.3- inch thickness between two sheets of plastic wrap. Cut dough into desired shapes with 2-3-inch cookie cutters. Make a hole at top of ornament with drinking straw or skewer. Place ornaments on baking sheet.
2. Bake 2-1/2 hours. Cool ornaments on wire wrack (or dry ornaments at room temperature by carefully placing them on a wire rack. Let stand for 1 to 2 days or until dough is throughly dry, turning occasionally).
3. Insert ribbon through holes and tie to hang. Decorate with opaque paint markers, or paint found at regular craft stores, if desired.
**Tip: If a different size bottle of cinnamon is used, measure 1 cup plus 2 tablespoons of cinnamon.**
I wish I could recall exactly where I got this recipe from, but alas, I don't. It was from some type of parenting website.
I like it, because you can make whatever shape you want by using cookie cutters and you can even dye the dough. I made dinosaurs last time. If you start with a great imagination, then you are off to a good start!

Christmas Dough Ornament Craft
This shiny Christmas dough ornament craft is the perfect finishing touch to decorating the tree. It can also be altered and made into lapel pins, magnets and gift-toppers.
What you'll need:
1/2 cup salt
1 cup flour
1/2 cup water
Rolling pin
Cookie Sheet
Toothpicks
Cookie cutters (stars, trees, etc.)
Acrylic paints (green, yellow, other colors of choice for embellishments)
Glitter glue or glitter paint
Ribbon
** Food coloring, if you would like to die the dough. Add a few drops to the water before mixing it with flour and salt. You can also paint them once they have baked. Artist's choice!**
How to make it:
1. Preheat oven to 250ºF.
2. Mix together salt, flour, and water until dough is formed.
3. Knead the dough on a floured surface until the mixture is elastic and smooth. If dough is too sticky, sprinkle with flour, continue to do so until stickiness is gone. Do not add too much flour, this will dry out dough and will cause it to crack before you have a chance to make it.
4. Roll out the dough to about 1/4" thick with rolling pin that has been dusted with flour.
5. Use cookie cutters to cut out as many trees and stars (dinosaurs, whatever you like!) as you want.
6. Use a toothpick to make a hole toward the top of the shape. Poke the toothpick into the shape, then holding the toothpick straight up and down, make a circular motion, as if you were stirring something. Keep circling until the hole is the size you want.
7. Place all shapes onto an un-greased cookie sheet and place into the preheated oven.
8. Bake for 2 hours.
9. Remove from oven and allow to cool completely.
10. Paint the trees green and stars yellow (but I say paint them whatever color that you want! Don't be held back from your creative genius.)
11. Use the handle end of the paintbrush to dot ornaments by dipping into paint then dotting onto ornament.
12. When paint is dry, use glitter glue or paint to put a sparkling cover coat on your ornaments.
13. When dry, thread ribbon through hole and tie a knot in the back.
14. Tie onto a package, if you would like.
Tips:
- If your toppers are large enough, you can make two hole in each so that you can thread ribbon through like a button, only showing a small amount of ribbon on the front.
- These make adorable pins to wear to school. Just don't make a hole. Glue a pin to the back of the completed ornament instead.
- Uncooked salt dough doesn't keep well, so only make enough dough for the ornaments you are going to make. If you are only making a few toppers, halve the ingredients above. The listed amounts will make enough ornaments for a classroom of 20.
**BONUS RECIPE**
When I was a kid, we would make these all of the time! The recipe was given to us by my mom's best friend, Libby. She passed away a couple of months ago and as a tribute to their 50 year long friendship, I share this recipe with you.
Cinnamon Ornaments
Makes: 12- 15 ornaments
Prep time: 30 minutes
Cook time: 2- 1/2 hours or 1 to 2 days drying time
3/4 cup applesauce
1 bottle (4.12 ounces) cinnamon
Other supplies:
Cookie cutters
Drinking straw
Colorful ribbon
1. Preheat oven to 200ºF. Mix applesauce and cinnamon in small bowl until a smooth ball of dough is formed. (You may need to use your hands to incorporate all of the cinnamon.) Using about 1/4 of the dough at a time, roll dough 1/4-inch to 1.3- inch thickness between two sheets of plastic wrap. Cut dough into desired shapes with 2-3-inch cookie cutters. Make a hole at top of ornament with drinking straw or skewer. Place ornaments on baking sheet.
2. Bake 2-1/2 hours. Cool ornaments on wire wrack (or dry ornaments at room temperature by carefully placing them on a wire rack. Let stand for 1 to 2 days or until dough is throughly dry, turning occasionally).
3. Insert ribbon through holes and tie to hang. Decorate with opaque paint markers, or paint found at regular craft stores, if desired.
**Tip: If a different size bottle of cinnamon is used, measure 1 cup plus 2 tablespoons of cinnamon.**
Book Space
I live in a small apartment. I mean, my apartment can fit inside of the classroom, in which I teach. No matter the size, I enjoy it and I find it cozy. One thing that is tough about an intimate living area, is the lack of space... for things, like books! I love to read. I have hundreds of books, though, I am working on breaking my attachment to books I didn't particularly care for. But, that is neither here nor there.
On Sunday, I woke up and decided that that was the day to do some apartment makeover activities. It was the second day of Christmas break, after all. I only have three weeks to get as much stuff as possible done.
So, I reattached the thing on the bottom of the front door, that had been partially ripped off and consequently was beginning to trap me inside. I had to stick the tip of my foot between the door and the screen and kick the door back... every morning, in the dark, in order to get out of my house. Score! One thing fixed!
I purchased some nice frames and a painting at Kohl's, at majorly discounted prices, for my bathroom. And I hung them up too! Score! Two things! They really spruce up my bathroom.

I hung a frame and some 'Z's above my bed. Let's face it, when I moved into this place a year and 8 months ago, I only focused on the living room and kitchen area, as these are the only places that people would be seeing, when visiting. Score, three things! I was on a roll!

Now, the most amazing thing that I did on Sunday, was purchasing 4 wooden crates from Michael's, some stain and poly coating, and a brush. I was in desperate need of some bookshelves or something of that sort to get some newly acquired books off of my living room floor. When I was at Michael's and I saw these crates, I was struck with an idea. I ran with it and I am extremely happy with the results. At first, I wanted to hang them all in my room, but they stick so far out, that I was afraid I would smack my head on them.
I ended up putting two in my living room, on top of my other bookcase. I am still trying to figure out where exactly I will place the other two. If I do choose to hang them in my room, I think I am going to need some brackets, to help support the weight of the books, so that the crate doesn't rip out of the wall.
I am very happy with the results and I think they look as if they have been in my living room all along.


On Sunday, I woke up and decided that that was the day to do some apartment makeover activities. It was the second day of Christmas break, after all. I only have three weeks to get as much stuff as possible done.
So, I reattached the thing on the bottom of the front door, that had been partially ripped off and consequently was beginning to trap me inside. I had to stick the tip of my foot between the door and the screen and kick the door back... every morning, in the dark, in order to get out of my house. Score! One thing fixed!
I purchased some nice frames and a painting at Kohl's, at majorly discounted prices, for my bathroom. And I hung them up too! Score! Two things! They really spruce up my bathroom.

I hung a frame and some 'Z's above my bed. Let's face it, when I moved into this place a year and 8 months ago, I only focused on the living room and kitchen area, as these are the only places that people would be seeing, when visiting. Score, three things! I was on a roll!

I plan on adding wings to the frame and spray painting the 'Z's gold.
Now, the most amazing thing that I did on Sunday, was purchasing 4 wooden crates from Michael's, some stain and poly coating, and a brush. I was in desperate need of some bookshelves or something of that sort to get some newly acquired books off of my living room floor. When I was at Michael's and I saw these crates, I was struck with an idea. I ran with it and I am extremely happy with the results. At first, I wanted to hang them all in my room, but they stick so far out, that I was afraid I would smack my head on them.
I ended up putting two in my living room, on top of my other bookcase. I am still trying to figure out where exactly I will place the other two. If I do choose to hang them in my room, I think I am going to need some brackets, to help support the weight of the books, so that the crate doesn't rip out of the wall.
I am very happy with the results and I think they look as if they have been in my living room all along.

Wooden crates from Michael's, $9.99 (4 total)

I suggest getting the smaller cans of stain and poly, because I could probably make 100 more of these crates and I would still have enough stain and poly to make at least 20 more! I got a brush (Linzer Stain and Poly) that is specifically for stain and poly. It is amazing!

What a difference, huh?

I had never stained before, my first two crates look great, because I took my time. The last two have a few drips here and there, but I think it adds to their charm. I chose a matte poly, in order to keep the 'rustic' look. I wasn't looking for a high shine manufactured look.

Here they are at home and filled with books. I really think they look great and they were so simple!

I mean, even the dinosaur is happy to have them near!

The best thing is that they got my extra books off of the ground and made room for more, that will undoubtedly come in the near future.
If you are wanting to do this project, may I suggest that you give yourself plenty of time? Before you put the poly coating on, your stain has to sit for an hour. Also, please have good air flow! My apartment was not ideal for this and I was getting some serious black lung and holes in the brain. However, I used what brain cells I had left and placed my fan in the kitchen, facing an open window and all was well.
Choose a stain that works well with your existing decor and have fun!
A simple project that delivers great results.
Merry Christmas!
Tuesday, December 10, 2013
What Should I Call These?
In my last post, I mentioned that I made some reindeer candy grams, in addition to some other ones made with candy canes and marshmallows. If you want to make these as well, check out the supplies below. BTW, this is a very easy treat to make... that is if all of your candy canes aren't broken like mine! Well ok, they weren't all broken. I needed 62 (ended up with 70), so I bought 6 boxes of 12... many were broken, thus leading me to buy a total of 96 candy canes in order to fulfill my duties as the leadership teacher.
What should these be called? My student showed me a picture and then I decided in my brain how I could make them, but I am sure they already have a name. Hmmm....

Supply List
2- bags jumbo marshmallows (1lb 8oz.)
3- 12 oz. bags of wilton candy melts (I used light cocoa)
70 -peppermint candy canes
Festive sprinkles and or candies
Parchment Paper (plastic wrap)
Cookie sheets (1-2 depending on how many you are making)
Treat bags
Ribbon
Cute tags
1. Prepare candy melts according to package directions.
2. Stick a candy cane into the middle of a marshmallow. Repeat until all candy canes are in a marshmallow.
3. Dip the candy cane/marshmallow into the chocolate (candy melts), using the candy cane as a handle and sprinkle with your choice of festive decorations, straight away.
4. Place the treat onto a lined cookie sheet (I generally prefer parchment paper, but I just ran out before making these, so I used plastic wrap and it worked excellently well.)
5. Allow to harden.
6. Wrap up and give away! Hooray!
Any ideas for names?
Peppermint and chocolate covered marshmallow sticks?
Peppermallow treats?
I have no idea what these should be called!
What should these be called? My student showed me a picture and then I decided in my brain how I could make them, but I am sure they already have a name. Hmmm....
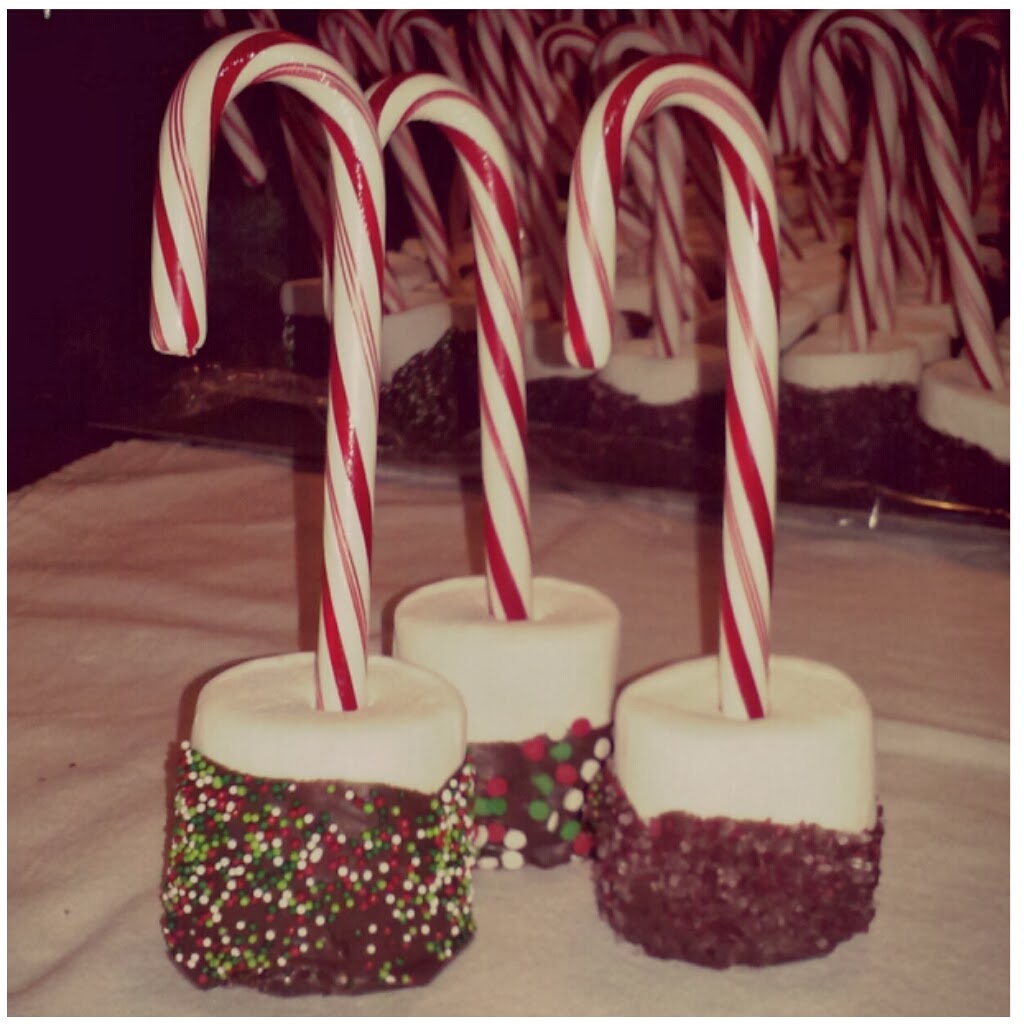
Photo by: Me, Tiffiny Hargrave
Supply List
2- bags jumbo marshmallows (1lb 8oz.)
3- 12 oz. bags of wilton candy melts (I used light cocoa)
70 -peppermint candy canes
Festive sprinkles and or candies
Parchment Paper (plastic wrap)
Cookie sheets (1-2 depending on how many you are making)
Treat bags
Ribbon
Cute tags
** Amounts can easily be adjusted to the amount that you wish to make. **
1. Prepare candy melts according to package directions.
2. Stick a candy cane into the middle of a marshmallow. Repeat until all candy canes are in a marshmallow.
3. Dip the candy cane/marshmallow into the chocolate (candy melts), using the candy cane as a handle and sprinkle with your choice of festive decorations, straight away.
4. Place the treat onto a lined cookie sheet (I generally prefer parchment paper, but I just ran out before making these, so I used plastic wrap and it worked excellently well.)
5. Allow to harden.
6. Wrap up and give away! Hooray!
Any ideas for names?
Peppermint and chocolate covered marshmallow sticks?
Peppermallow treats?
I have no idea what these should be called!
Thursday, December 5, 2013
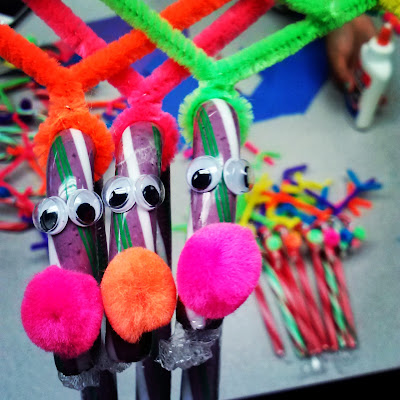
Candy Grams
We have been in the middle of a huge candy gram sale at school for the past two weeks. We always do this as a huge Christmas time fundraiser for leadership. This year we decided to make wild rainbow reindeer and peppermint candy canes with chocolate covered marshmallows.
They have been selling like hot cakes.
Here are the rainbow reindeers:
They have been selling like hot cakes.
Here are the rainbow reindeers:

Photo by: Me, Tiffiny Hargrave
My students worked really hard to make these today and I think that they turned out really well.
If you would like to make some of your own here is the supply list:
Fruity candy canes
Colorful pipe cleaners
Small googly eyes
Small colorful pom poms (for the nose)
Elmer's glue
scissors
Hot glue gun and glue, if you are doing the gluing and your kids or students are not.
We folded the pipe cleaners in half and then about 1-1/2 inches down, we cut the 2 tips off. We then took the folded pipe cleaner and twisted it around the candy cane a few times. Once that was secure, we then folded each tip in half and twisted one on each antler that is already secured to the candy cane. Put tiny dabs of glue (or hot glue) on the eyes and stick them on. Now, put a small dab of glue (or hot glue) on the nose and stick it on at the bottom of the curved end.
I think the wild colors really make these a ton of fun, but the great thing about these is that you can use any type of candy cane and colors that you wish!
** I suggest you use a more permanent type of glue, other than Elmer's. We had some eyes fall off. So, the hot glue would be perfect, but if you are working with kids, perhaps Krazy glue... but that seems equally dangerous to me.**
Friday, November 29, 2013
Lemon Butter Flank Steak
I made this a couple of years ago. It was one of the last meals that I made for my granma, before she passed away.
This is from Better Homes and Gardens.
This was really quite delicious, if you don't believe me, ask the dishes! (Sorry couldn't resist)

Lemon Butter Flank Steak
1- 1/2 pound beef flank steak
1/4 cup chopped fresh cilantro
4 Tablespoons olive oil
4 teaspoons finely shredded lemon zest
2 Tablespoons lemon juice
2 cloves garlic, minced
1/4 teaspoon crushed red pepper
1 recipe lemon butter (below)
4 cups shredded napa cabbage (I didn't know what that was, so I just got regular cabbage.
Same thing?)
Same thing?)
1 cup fresh bean sprouts
2 green onions, bias- sliced into 1-in. pieces.
1. Place Flank Steak in a shallow dish. Add cilantro, half of the olive oil, the lemon peel and juice, garlic, 1/2 tsp. salt, 1/4 tsp. pepper, and the red pepper. Turn steak to coat. Cover; chill 30 minutes to 1- 1/2 hours.
2. Meanwhile, prepare lemon butter (I didn't have any lemongrass, so I just used more lemon zest. It turned out just fine, but I can only imagine how much better it would have been with the lemongrass!); set aside. In a 12-inch nonsitck skillet heat remaining oil over medium heat. Remove steak from marinade; discard marinade. Cook steak for 5 minutes or to desired doneness, turning once. Cover; let stand 10 minutes.
3. Add vegetables to skillet. Cook and stir over medium heat for 2 minutes or until crisp- tender. Season with salt and pepper. Serve steak with vegetables and lemon butter. Makes 4 servings.
Lemon Butter:
In a bowl combine 3 Tbsp. softened butter, 3 Tbsp. minced lemongrass, 1/4 cup cilantro, 1 Tbsp lemon juice, and salt, pepper, and crushed red pepper to taste.
Thursday, November 28, 2013
Gingerbread Men Cookies
A McCormick recipe.

Photo by: Me, Tiffiny Hargrave
Gingerbread Men Cookies
Makes: 2 dozen or 24 (1 cookie) servings...
(I got about 4 1/2 dozen. I may have used a really small cookie cutter)
Prep: 20 miutes
Refrigerate time: 4 hours
Cook time: 8- 10 minutes per batch
3 cups flour
2 teaspoons Ginger, ground
1 teaspoon Cinnamon, ground
1 teaspoon Baking soda
1/4 teaspoon Nutmeg, ground
1/4 teaspoon salt
3/4 cup (1-1/2 sticks) butter, softened
3/4 cup firmly packed brown sugar
1/2 cup molasses
1 egg
1 teaspoon vanilla
Mix flour, ginger, cinnamon, baking soda, nutmeg, and salt in large bowl. Set aside.
Beat butter and brown sugar in large bowl with electric mixer on medium speed until light and fluffy. Add molasses, egg, and vanilla; mix well.
Gradually beat in flour mixture on low speed until well mixed.
Press dough into a few flat discs. Wrap in plastic wrap. Refrigerate for 4 hours or overnight.
Preheat oven to 350º. Roll out dough to 1/4-inch thickness on a lightly floured work surface.
Cut into gingerbread men shapes with cookie cutter.
Place 1-inch apart on ungreased baking sheets.
Bake 8- 10 minutes or until edges of cookies just begin to brown.
Cool on baking sheets 1 to 2 minutes.
Remove to wire racks to cool completely.
Decorate cookies as desired.
Store cookies in airtight container up to 5 days.
Wednesday, November 27, 2013
Nantucket Cranberry Pie
I have made this pie a few times and it is not only easy, but it is super delicious. The people seem to love it as well.

Nantucket Cranberry Pie
Difficulty: Easy
Servings: 8 (or less depending on how much you want to eat in one sitting)... or more.
Prep: 10 minutes
Cook time: 35- 45 (depending on your oven)
Butter, For Greasing
2 cups (heaping) Cranberries
¾ cups Pecans, Chopped (measure, Then Chop)
⅔ cups Sugar
1 cup Flour
1 cup Sugar
1 stick Unsalted Butter, melted
2 whole Eggs, Lightly Beaten
1 teaspoon Pure Almond Extract
¼ teaspoons Salt
1 Tablespoon Sugar For Sprinkling
*Adapted from a recipe by Laurie Colwin*
Preheat oven to 350 degrees.
Generously butter a cake pan or pie pan. Add cranberries to the bottom of the pan. Sprinkle on chopped pecans, then sprinkle on 2/3 cup sugar.
In a mixing bowl, combine flour, 1 cup sugar, melted butter, eggs, almond extract, and salt. Stir gently to combine.
Pour batter slowly over the top in large “ribbons” in order to evenly cover the surface. Spread gently if necessary.
Bake for 45 to 50 minutes. 5 minutes before removing from oven, sprinkle surface with 1 tablespoon sugar for a little extra crunch.
Cut into wedges and serve with ice cream or freshly whipped cream.
Tuesday, November 26, 2013
Christmas Cookies: Butterscotch Fingers
I have made some great cookies from Good Housekeeping over the years. I was thankful to receive their Christmas Cookies cookbook, from my best friend Nicki. The following recipe comes from this book. Butterscotch Fingers are super easy to make and they taste great. Just keep in mind that they need to chill for a substantial amount of time, before slicing and baking.

Butterscotch Fingers Good Housekeeping
Active time: 30 minutes, plus chilling
Bake time: 12 to 14 minutes per batch
Makes: 66 cookies
2-1/3 cups all purpose flour
1/2 teaspoon baking powder
1/2 teaspoon salt
1 cup butter or margarine (2 sticks), softened
1 cup packed dark brown sugar
1 teaspoon vanilla extract
1 large egg
3/4 cup pecans, chopped
1. On waxed paper, combine flour, baking powder, and salt.
2. In large bowl, with mixer on medium speed, beat butter and brown sugar until creamy, occasionally scraping bowl with rubber spatula. Beat in vanilla, then egg. On low speed, gradually add flour mixture; beat just until blended, occasionally scraping bowl. With spoon, stir in pecans.
3. Shape dough into 12" by 3-3/4" by 1" brick. Wrap in plastic and refrigerate until firm enough to slice, 6 hours or overnight; if using margarine, freeze overnight. (Dough can also be frozen up to 3 months.)
4. Preheat oven to 350ºF. Grease large cookie sheet.
5. With sharp knife, cut brick crosswise into 1/8-inch thick slices. Place slices, 1-inch apart, on prepared cookie sheet. Bake until lightly browned around edges, 12 to 14 minutes. With wide metal spatula, transfer to wire rack to cool. Repeat with remaining dough.
6. Store cookies in cookie jar up to 1 week.
Each cookie: about 65 calories, 1g protein, 7g carbohydrate, 4g total fat (2g saturated), 0g fiber, 11mg cholesterol, 55mg sodium
Monday, November 25, 2013
Christmas Cookies: Melt- Aways
The name says it all - these cookies melt in your mouth.
Active time: 25 minutes, plus chilling
Bake time: 19- 22 minutes per batch
Makes: 42 cookies
Melt-Aways Good Housekeeping
2 cups all-purpose flour
1/4 cup cornstarch
1/8 teaspoon salt
1 cup butter (2 sticks), softened (no substitutions)
2 cups confectioners' sugar
2 teaspoons vanilla
1. Preheat oven to 325ºF. On waxed paper, combine flour, cornstarch, and salt.
2. In large bowl, with mixer on medium speed, beat butter until creamy. Beat in 1 cup confectioners' sugar until light and fluffy. On low speed, beat in flour mixture, then vanilla. Cover bowl with plastic and refrigerate 1 hour.
3. With hands, shape dough by heaping measuring teaspoons into 1-inch balls. Place balles, 1-inch apart, on ungreased large cookie sheet. Bake until set and lightly golden around edges, 19- 22 minutes. With wide metal spatula, transfer to wire rack to cool slightly.
4. Sift remaining 1 cup of confectioners' sugar into medium bowl. While cookies are still warm, roll in sugar to coat; return to rack to cool completely. When cool, gently roll cookies in sugar again. Repeat with remaining dough in sugar.
5. Store cookies in a cookie jar up to 1 week.
Each cookie: About 90 calories, 1g protein, 11g carbohydrate, 5g total fat (3g saturated), 0g fiber, 13mg cholesterol, 55mg sodium.
Sunday, November 24, 2013
Christmas Cookies: Spiked Eggnog Chews
These are on my list of cookies to make between now and Christmas. I just found the recipe in Redbook magazine. I hope that you'll try them out.


Photo by: Andrew Purcell
Spiked Eggnog Chews Redbook
Prep Time: 15
minutes
Chilling time: 1
hour
Cooking time: 22
minutes
1 stick unsalted
butter, melted
1-1/2 cups sugar,
plus more for rolling
1 Tbsp canola oil
1 large egg
2 Tbsp milk
1 Tbsp dark rum
(or 1 tsp rum flavoring)
1 Tbsp vanilla
extract
2 cups
all-purpose flour
1-1/2 tsp baking
powder
1/4 tsp baking soda
1/2 tsp nutmeg
1/4 cup decorating sugar
1. Heat oven to 350ºF. Line 2 baking sheets with parchment.
2. In a large bowl, stir butter, sugar,
oil, and a pinch of salt until combined.
Stir in egg, milk, rum, and vanilla extract until combined. Add flour, baking powder, baking soda,
and nutmeg; stir until just combined.
Tightly cover bowl with plastic wrap and chill for 1 hour.
3. Form 3-Tbsp dough balls; place onto
pans. Place sugar for rolling in
the same bowl. Roll each dough
ball in sugar and place back on pan, leaving at least 2 inches between each
cookie. Flatten each dough ball to
about 1 inch tick and sprinkle with decorating sugar. Bake one pan at a time, until cookies' centers have risen
and are beginning to crack, 11 to 13 minutes.
4. Remove pan from oven and tap on counter
to help cookies deflate. Let the
cookies cool on pan, 5 minutes, then transfer to a wire rack. Repeat with second pan.
Makes 15 large
cookies.
** I made a few batches of these and they turned out really well. They were a big hit at my cookie exchange, too. I used dough balls about 1 Tbsp in size and the cookies were big. So, I suggest that you cut the 3 Tbsp down.**
** I made a few batches of these and they turned out really well. They were a big hit at my cookie exchange, too. I used dough balls about 1 Tbsp in size and the cookies were big. So, I suggest that you cut the 3 Tbsp down.**
Saturday, November 23, 2013
A Book in Review: Waiting for Wren

Well, I have finished this book. First, I would like to thank Cate Beauman for giving me the opportunity to read her work as part of 'First reads' (a signed copy!). Not only did she send the book along, but it came with a bag of Dove chocolates and a pen. Awesome! So, thanks!
If the timeframe in which I read this book tells you anything (1 day... or 10 hours once you cut out sleep and work), you should read this book. I enjoyed the mystery, I enjoyed the connection between the characters. I had the bad guy picked out, but Beauman did a good job of convincing me that it wasn't him. But, in the end, I was right! I didn't really realize that this was a romance novel until I reached the second half and there was a bit of sex. However shocking that was for me at first, I got over it and didn't let it overpower the story line. And what is life without a little romance every now and again, even if you have to read about it? I don't have any romance in my life, so this is the route I shall take, for now.
There were some side characters in this book that were the stars of the show, earlier in the series. I now have the pleasure of going back and reading the first four books, when money and time permit.
I recommend this book if you want a fun, easy mystery to get you through your day!
4 out of 5 stars, I really liked it
You may check out this review and many others at my Goodreads page. Plus, it is home to thousands of books and many people share their opinion on any book that you can think of!
Tuesday, November 19, 2013
The Most Wonderful Time of the Year?
There are songs, there are commercials, movies...
All of which tell me that this time of the year is the best. It is filled with kindness, heart warming family time, thoughtful gifts, shared meals, cheer, and fun activities.
Usually I agree, but more and more as the years go by, I am not certain.
You see, growing up, my family was the family that got kicked out of my grandparents house on Thanksgiving day. My family was the family that always got in fights. My family is the family that has the troubled older brother that causes anguish for everyone, when we should be hugging by the tree.
Luckily, I had people in my life like my Aunt Jeri and the Richey's. My Aunt Jeri took us in when we got kicked out and the Richey's took me in when my mom worked on the holidays. I don't think they know how much this has meant to me. As the years went on, we got invited over less and less, which is just how things happen to go. I went off to college and my mom moved, but we still lived near.
This has left just me and my mom. This is sad to me. My grandma passed away 2 and a half years ago and she was always willing to meet up, if just for a little bit. Now that she is gone, my grandpa doesn't want to go anywhere. This year he decided to leave the house, but he won't be joining me and my mom. No, he'll be going on a cruise with some woman that none of us know. My brother is always in jail and is really a hard person to get along with, so count him out.
My Uncle never leaves LA and when he got re-married in the late 90's he converted to Judaism. So, he is out for Christmas, but hey Thanksgiving is still a perfectly suitable holiday for all religions, is it not? Just before my grandma passed, my uncle and his family joined us twice. It was really nice. I enjoyed seeing everyone. We ate food, we laughed, we sang karaoke. It was grand! I love times like this and I will remember them always.
Because my mom, a nurse always worked on Thanksgiving, we started a tradition of inviting friends over the Saturday after Thanksgiving. We did this so that we could share the holiday with the people that we really like and love... our friends... those that mean the most to us. We would plan a menu and make a great evening out of it. Fewer and fewer people have been coming and this year, no one has responded to my invitation at all. I was never sad about missing actual Thanksgiving, because I knew we would be making it up a couple of days later.
Don't get me wrong, I am thankful for everything that I have. I am educated, I have a career, I am able to pay my bills on time, I have a place to live and I am able to buy food. I am also thankful for the handful of amazing friends that I have. I cherish the time that we get to spend together...
Now listen, I don't want pity. I guess my reason for writing this is to understand that while we often focus our attention to those in need (homeless, foodless, etc.), during the holidays, it would be nice to also remember those who do have a home and food, but are left wanting in another way... family.
We all desire a human connection this time of the year and that is what makes it perhaps that saddest part of the year and not the best. Never stop giving compassion to those in need, but make some room in your heart and home for those who need a surrogate family. I know we all get busy and have our own things to worry about and get done, but friends, for goodness sake open your eyes and perhaps take the time to invite someone to your house to celebrate!
You will probably argue that my mom should be enough and I enough for my mom and you are right. I am glad that she is alive and is someone that I can connect with on a daily basis, but sometimes it just doesn't feel like we are cared for. Perhaps that is what it comes down to, our friends say they love us, they say they think about us, but when it comes down to the nitty gritty... are they there for us? It is great to have friends around when all is well and peachy keen, but it is better to have them around when you are feeling down in the dumps and a little left out.
On a more positive note, I do know that my friends truly do care about me and when it comes down to brass tacks, they would do anything for me and I for them. (I realize that I probably sound a bit off my rocker, pondering if my friends care for me and then declaring that they do moments later, but sometimes thoughts don't make any sense.) So, it is with this at the moment sad heart that I know all will be alright and that all will be well and that I shall enjoy the family I do have and the time I get to spend with them, even if it is made up solely of my mom.
Just something to think about as you plan out your Thanksgiving, Hanukkah and Christmas.
After writing this post, I feel better. I just needed to get it off of my mind and I am thankful for this avenue in which I can do so. I also realize that in times like these it is in my best interest to rely more heavily on God. I am just a stubborn person and always try to do things on my own.
Subscribe to:
Posts (Atom)